


The Art of Embroidery Hoops: Turning Stitches into Timeless Wall Art
Embroidery has come a long way from just monograms on handkerchiefs or logos on polos. These days, more and more people are embracing theart of embroidery hoops and honestly, its one of the coziest and most creative ways to bring texture, personality, and timeless charm into your space.
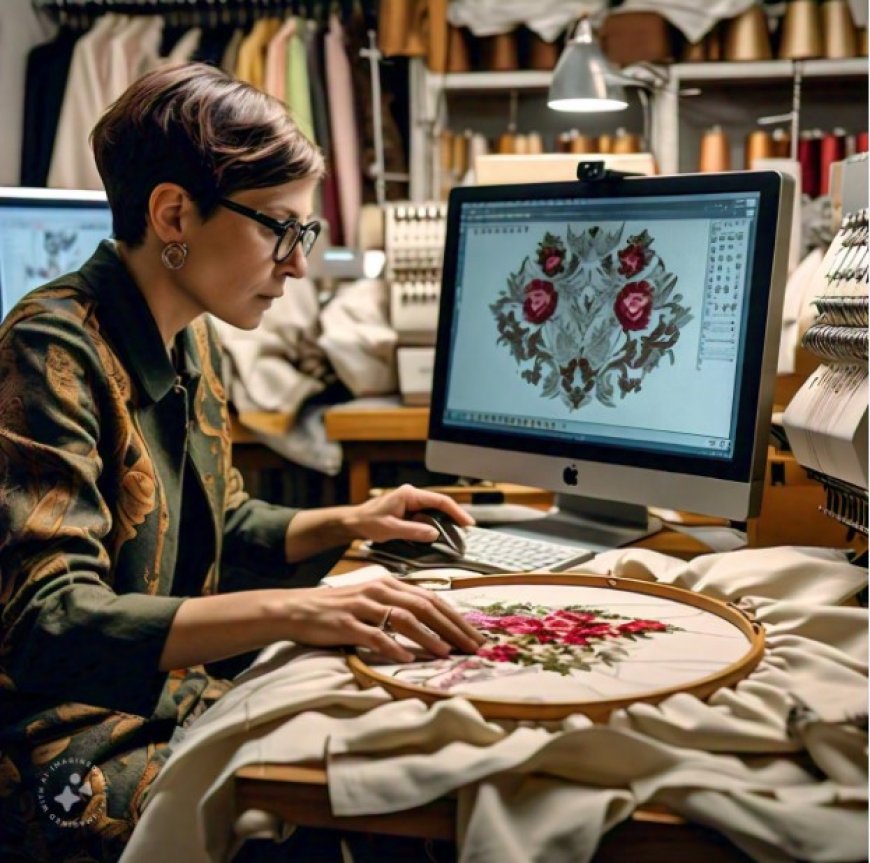
Want to stitch your own design into a beautiful hoop display but dont know how to prep it? Thats where Digitizing Buddy shines. They turn your sketches, quotes, or digital art into custom embroidery files you can load directly into your machine perfect for beginners or seasoned stitchers creating wall-worthy hoop art.
What Is Embroidery Hoop Art?
Embroidery hoop art is the creative use of a classic embroidery hoop not just as a tool, but as a frame for showcasing your stitched design. These pieces are then displayed on walls, shelves, or desks as beautiful, tactile, and often sentimental decor.
From simple floral designs to full-blown portraits and typography, hoop art has become a popular way to blend craftsmanship and creativity in a modern context.
Why Embroidery Hoops Make Great Wall Art
Lets face it plain walls are boring. Heres why embroidery hoop art is making a comeback in decor trends:
- Tactile & handmade: Adds warmth and a handmade touch to your space
- Budget-friendly: Great for DIY decorators
- Customizable: Create art that speaks to your personal style
- Lightweight & easy to hang: No need for heavy frames
- Unique: No two hoop arts are exactly alike
Its a blend of old-school tradition and modern aesthetics.
Types of Embroidery Hoops to Use
Before you start stitching, youll need the right hoop. Not all hoops are created equalsome are better for crafting, others for display.
Wooden Hoops (Best for Wall Art)
- Warm, classic look
- Lightweight and easy to paint or stain
- Looks great as a frame when hung
Plastic Hoops
- Great for stitching but not ideal for display
- Often brighter in color
- Some include grippers for holding fabric tighter
Bamboo Hoops
- Eco-friendly and affordable
- Clean, natural look
- Perfect for rustic or minimalist decor
For wall art, wooden or bamboo hoops are your best betespecially those with brass screws on top for hanging.
Design Ideas for Hoop Art
You can stitch almost anything into a hoop, but here are some popular themes:
1. Florals & Botanicals
- Timeless, elegant, and beginner-friendly
- Perfect for bedroom or bathroom decor
2. Pet Portraits
- A heartfelt tribute to your furry friend
- Great gift idea for pet lovers
3. Quotes & Sayings
- Uplifting, funny, or sarcasticchoose your vibe
- Looks amazing in living rooms or entryways
4. Landscapes or Abstract Art
- Get creative with color and texture
- Makes a bold statement piece
5. Baby Names or Wedding Dates
- Personalized gifts that become family keepsakes
- Often featured in nurseries or gallery walls
How to Create Embroidery Hoop Wall Art (Step-by-Step)
Lets walk through the process of turning stitches into stunning decor.
Step 1: Choose or Create Your Design
You can either:
- Buy a pre-digitized design online
- Draw your own artwork
- Use a quote or text design
- Hire a digitizing service like Digitizing Buddy to turn your vision into a clean, machine-readable file (PES, DST, etc.)
Make sure your design fits the hoop size you plan to usetypically 4", 6", or 8" are the most common.
Step 2: Pick the Right Fabric
Good fabric = smoother stitching and a cleaner finish.
Best fabrics for hoop art:
- Cotton (easy to work with)
- Linen (adds texture)
- Canvas or muslin (more rustic look)
Make sure to iron your fabric before placing it in the hoop to avoid puckering.
Step 3: Hoop the Fabric Properly
Heres how to do it:
- Loosen the screw on the outer hoop
- Lay your fabric over the inner hoop
- Push the outer hoop on top
- Pull the fabric taut evenly
- Tighten the screw securely
Tip: The tighter the fabric, the cleaner your stitches will look.
Step 4: Load the Design into Your Machine
If you're using a Brother, Janome, or similar embroidery machine:
- Save the file (like PES or DST) to a USB
- Load it into your machine
- Choose your thread colors and place your hooped fabric in the machine
- Stitch away!
Step 5: Finishing the Back of the Hoop
Once your design is stitched:
- Trim excess fabric around the edge
- Use hot glue or a running stitch to gather the back
- Cover the back with felt or fabric circle for a clean finish
This makes the hoop look neat and ready to hang or gift.
How to Display Embroidery Hoop Art
Hoop art is lightweight, which makes it super easy to hang:
- Use the metal screw as a hook
- Tie a ribbon around the top for extra charm
- Hang with Command Strips for rental-safe decor
- Prop it on a shelf or desk as part of a vignette
- Combine multiple hoops to create a gallery wall
You can even paint or stain the hoop for a more finished, framed look!
Common Mistakes to Avoid
? Puckered fabric
? Solution: Pull the fabric tight in the hoop and use stabilizer when needed.
? Overly complex designs
? Solution: Start simple. Hoop art works best when designs are clean and bold.
? Using too-small hoops for big designs
? Solution: Always scale your design to fit your hoop.
? Messy backing
? Solution: Dont forget to tidy up the back if itll be visible.
Why Hoop Art Is the Perfect DIY Project
If you love being creative but dont want a big messy setup, hoop art is ideal. Heres why:
- Quick and satisfying to make
- Totally customizable
- Makes thoughtful gifts
- Doesnt take up much space
- Suitable for all skill levels
- Brings a handmade touch to your space
Plus, embroidery is super relaxing and therapeutica nice way to unplug from tech and get lost in stitches.
Final Thoughts: Stitch Your Way Into Wall Art
Embroidery hoop art is a beautiful blend of tradition and creativity. Whether you're stitching flowers, phrases, or portraits, youre creating something uniquely yoursand ready to hang with pride.
And if you're serious about making hoop art that pops, be sure to start with a properly digitized design. Digitizing Buddy makes it easy, even if you're a complete beginner. You send them your image or sketchthey send back a clean embroidery file ready to stitch.